Monday, January 7, 2013

Vegetarian Stew Recipe

Friday was cold and windy. It was the perfect night to make my mom's beef stew recipe. Only I had one dilemma...my boyfriend is vegetarian. I took a risk and modified the beef stew to be vegetarian friendly. I was pleasantly surprised to discover that he loved it and I still got my comfort food fix!


Ingredients:
1/3 cup vegetable oil
1 medium onion chopped
1 garlic glove minced
2 rosemary sprigs
2 "Not-Beef" Bouillon Cubes
3 tbsp flour
1 tsp salt
1/4 tsp pepper
4 medium potatoes chopped in cubes
4 or 5 carrots chopped
1 16 oz. can white Cannellini beans rinsed
1 box of Lightlife's Smart Strips Seasoned Veggie Strips (or your preferred soy "meat")
(**If soy "meat" is not your thing, double up on the beans)
1 tbsp Worcester sauce
1/3 cup red wine (optional)

Method:
In large pot heat the vegetable oil on medium heat. Add the soy "meat", chopped onion, garlic, and rosemary to the oil; cook until tender and light in color. 
 Stir in red wine to loosen the ingredients. 
Add the flour; stir to a paste. 
 Gradually stir in 3 cups of water on medium heat, until mixture is slightly thickened. 
 Add 2 "No Meat" bouillon cubes and Worcester. 
 Add chopped vegetables. 
Bring to a boil then reduce heat to a low simmer . Cover with a lid and simmer for about 30 minutes or until vegetables are tender.

Tip* You may want to add more flour or more liquid depending on how thick you want the stew to be.
Tip* The stew tastes even better the second day!

Enjoy! 


Thursday, January 3, 2013

DIY Gift Tags (From Recycled Holiday Cards)

Happy New Year! I hope you enjoyed the holidays! I had a great time hibernating at my grandmother's house in Canada, eating lots, and relaxing with my family.
I like to keep my Christmas decorations up for a least a week or so after the New Year.  I don't like how my apartment feels empty when they're gone.  I guess that I can use it as motivation to try new projects!  
I have a little tip to share with you that's economically and environmentally friendly!  Last year I cut up the Christmas cards I received and saved them to make gift tags for this year.  I saw the idea on Pinterest (as usual).  Holiday cards are always so pretty, and I was happy to put them into use instead of throwing them away. (Plus they came in handy since I didn't need to buy tags from the store!)

Creating these tags were effortless!  

1. After cutting your cards, punch a hole.


2. Tie on a piece of ribbon.


3. Write your message on the back and tie the tag onto the gift! 

I hope you found this little tip useful for next year's gifting! 

Stay warm!


Monday, December 10, 2012

Holiday Party Recap

Hello! Over the weekend my boyfriend and I hosted a holiday party for our friends.  The party was a blast, and I enjoyed baking and decorating!  I found this cute Christmas tree brownie idea here and attempted to do it myself.  I'm not the best froster, but this was a fun way to make the brownies festive!
Photo credit: David Santiago
I bought the pearl sprinkles and the decorating icing at AC Moore. I kept mine simple, but you can go all out with the decorating! 
**Tip: If you want to use a candy cane for the trunk of the tree, make sure you make thick brownies.  My brownies were on the thinner side, so the candy cane didn't fit. 

We also bought these awesome photo props from Party Goodies on Etsy.  She can customize your order.  


The theme of the party was Eat, Drink, & Be Merry!  We used this print out as part of the table centerpiece. 

Hope you're enjoying the holiday hustle bustle! Have a great week!

Sunday, December 9, 2012

Christmas Molasses Cookies

For me, molasses cookies taste like Christmas...must be all my wonderful memories of eating molasses cookies in my Sitty's kitchen while spending the week at her house with all the family over the holidays. (Sitty is grandma in Arabic.)  While I can never replicate my Sitty's molasses cookies, I am excited to say that I finally got them right this year!  The touch of cinnamon, gloves, and ginger make this cookie a rich, but not overly sweet cookie for the holidays!

Check out the recipe from my last year's post around this time....Molasses Cookies Recipe.


Tuesday, December 4, 2012

Pine Cone Frenzy

Lately I've been a little pine cone happy (as strange as that may sound)!  It all started with using pine cones as place holders in my previous Thanksgiving post.   Now I'm using pine cones to compliment my holiday decorating! I found my inspiration on pinterest.

DIY Pine Cone Door Hanging:

This is a easy and fast project.  I finished it in about 10 minutes! 

Materials:
Ribbon
Pine cones
Hot glue gun
Scissors

Method: 
1. Cut ribbon to desired length.  (Hold the ribbon from the door hook to see how low you want the pine cones to hang.)  Tie a knot where you want the pine cone positioned.
2. Tie a bow at the knot.  
3. Hot glue the bow to bottom of pine cone.

4.  Trim the excess ribbon on the side not for hanging.

5. Tie all the ribbons you have together and hang.  I used 3 pine cones but you can use more or less.


More pine cone decorating:


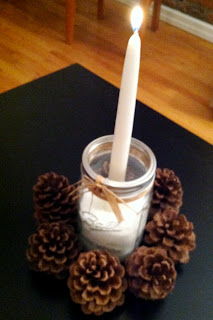
Coffee table center piece:
(pine cones, mason jar, epsom, salt, candle)

Mixing glam with rustic: 
(vase, costume jewelry bracelet, pine cone)


What are your favorite holiday decorating tips?