Tuesday, December 17, 2013

Holiday Mason Drink Jar Tutorial


Together David and I made holiday mason jars for our Holiday Party last weekend.  They gave the party an extra festive touch! 
We gathered our saved mason jars from tomato sauces, and soaked them in hot water to remove the labels.
 
These tags are for guests to mark their jars with their names.
Cut strands of ribbon to wrap around the jar, and string the tags through the ribbon.
Hot glue the ribbon to secure it on the jar.
                                            
Finish it off with a striped straw and voila!
                              
 
We served mango mojitos in our jars.
I recommend using plastic straw as these paper ones got too soft.
 
 
I hope you're enjoying you holiday festivities!
 

Monday, December 9, 2013

Decor Find! (Rocks&Mountains)

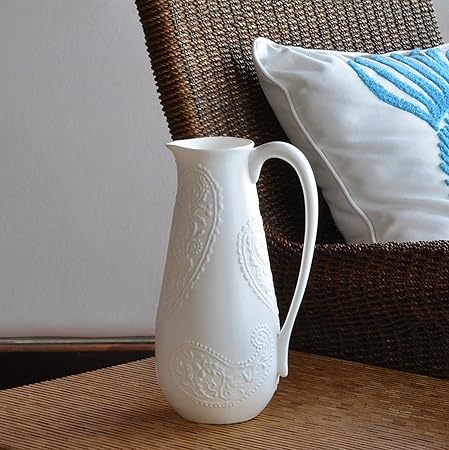
How is your holiday shopping going?  I'm just about done with mine.  I have some fun DIY projects that I will share soon too.  In the meantime...I want to share some beautiful décor that Rocks & Mountains is selling on Amazon. 
Rocks & Mountains specializes in white bone china. (I wish I had a bigger apartment so that I could to get more of their décor!) 

Here are some of my favorites. Check their website for more items.

http://www.amazon.com/Paisley-Decorative-Pitcher-White-Large/dp/B00GRKGO2U/ref=sr_1_5?s=home-garden&ie=UTF8&qid=1386639043&sr=1-5


http://www.amazon.com/12-5-inch-Bone-China-Platter-White/dp/B00DCG8ZNI/ref=sr_1_3?s=home-garden&ie=UTF8&qid=1386640845&sr=1-3


http://www.amazon.com/Decorative-Vases-Diamond-Pattern-2-Pack/dp/B00DH50YQ0/ref=aag_m_pw_dp?ie=UTF8&m=A29Z5KLHPDB50Q


http://www.amazon.com/Slate-Planter-Decorative-Vase-White/dp/B00GU7LOD4/ref=aag_m_pw_dp?ie=UTF8&m=A29Z5KLHPDB50Q


Stay tuned for some simple holiday DIY projects!


Sunday, November 24, 2013

DIY Winter Decorative Bottle

I have been wanting to try this beautiful DIY winter decorative bottle by Sweet Something Design since last year! I finally followed through.  This is a great project for winter decorating! The bottle would look great on a mantle.  See the Sweet Something Design link (above) for the tutorial.


(I copied piano sheet music.  Snowflake decoration is from AC Moore.)


Thanks David for taking the pictures!  Find David's beautiful bone china decor here: Rocks&Mountains

Stay warm!


Tuesday, November 12, 2013

Christmas Wreaths (Hi again!)

Now that the warm weather is gone, I have turned my focus to back inside projects.  (I guess I'm a seasonal blogger.) The holidays are approaching, and I've been feeling crafty! I'm not skipping over Thanksgiving, but is the Christmas Wreath I made for this year.  (I still have my Autumn Wreath hanging.)

Christmas Wreath

I made a mini version with a cute owl decoration for my boyfriend! 

Mini Christmas Wreath
I purchased all the materials at AC Moore.  
For the large and mini wreath I simply tucked each piece between the vine branches.  I hot glued the owl.
Tip: Always check Retailmenot.com before checking out. I scored a 25% off coupon! 

Tuesday, May 21, 2013

Healthy dinner: Kale and White Bean Couscous Recipe

Hi! I have neglected my blog for far too long.  Last night I tried a new recipe that inspired me to share it on here.  I found the recipe on allrecipes.com.  I love the earthy flavors that the whole wheat couscous and toasted almonds give to this dish.  It makes a perfect fast and healthy meal for the summer.


Kale and White Bean Couscous

Ingredients: 
1 cup water
2 tbsp butter
1 cup whole wheat couscous
2 tbsp olive oil
1 (15oz) can cannellini beans, drained and rinsed (alternative white beans can be used)
1 cup chopped kale
4 cloves garlic, crushed
1/4 cup whole almonds, halved (toast first at 350 degrees until you smell the almonds)
1/4 cup grated Parmesan cheese
salt and back pepper to taste

Method: (Makes 4 servings)
1. Bring water and butter to a boil in a saucepan; remove from heat.  Add couscous and stir well.  Cover saucepan and let couscous sit until water absorbed, about 5 minutes.  Fluff couscous with a fork.

2. Heat olive oil in a skillet over medium heat; cook and stir cannellini beans, kale, and garlic in the hot oil until kale is wilted, 5 to 10 minutes.  mix kale mixture into couscous; fold in almonds.

3.  When serving, top with Parmesan cheese.  Season with salt and pepper to taste. 

If you try it, let me know how you like it! 

Monday, January 7, 2013

Vegetarian Stew Recipe

Friday was cold and windy. It was the perfect night to make my mom's beef stew recipe. Only I had one dilemma...my boyfriend is vegetarian. I took a risk and modified the beef stew to be vegetarian friendly. I was pleasantly surprised to discover that he loved it and I still got my comfort food fix!


Ingredients:
1/3 cup vegetable oil
1 medium onion chopped
1 garlic glove minced
2 rosemary sprigs
2 "Not-Beef" Bouillon Cubes
3 tbsp flour
1 tsp salt
1/4 tsp pepper
4 medium potatoes chopped in cubes
4 or 5 carrots chopped
1 16 oz. can white Cannellini beans rinsed
1 box of Lightlife's Smart Strips Seasoned Veggie Strips (or your preferred soy "meat")
(**If soy "meat" is not your thing, double up on the beans)
1 tbsp Worcester sauce
1/3 cup red wine (optional)

Method:
In large pot heat the vegetable oil on medium heat. Add the soy "meat", chopped onion, garlic, and rosemary to the oil; cook until tender and light in color. 
 Stir in red wine to loosen the ingredients. 
Add the flour; stir to a paste. 
 Gradually stir in 3 cups of water on medium heat, until mixture is slightly thickened. 
 Add 2 "No Meat" bouillon cubes and Worcester. 
 Add chopped vegetables. 
Bring to a boil then reduce heat to a low simmer . Cover with a lid and simmer for about 30 minutes or until vegetables are tender.

Tip* You may want to add more flour or more liquid depending on how thick you want the stew to be.
Tip* The stew tastes even better the second day!

Enjoy! 


Thursday, January 3, 2013

DIY Gift Tags (From Recycled Holiday Cards)

Happy New Year! I hope you enjoyed the holidays! I had a great time hibernating at my grandmother's house in Canada, eating lots, and relaxing with my family.
I like to keep my Christmas decorations up for a least a week or so after the New Year.  I don't like how my apartment feels empty when they're gone.  I guess that I can use it as motivation to try new projects!  
I have a little tip to share with you that's economically and environmentally friendly!  Last year I cut up the Christmas cards I received and saved them to make gift tags for this year.  I saw the idea on Pinterest (as usual).  Holiday cards are always so pretty, and I was happy to put them into use instead of throwing them away. (Plus they came in handy since I didn't need to buy tags from the store!)

Creating these tags were effortless!  

1. After cutting your cards, punch a hole.


2. Tie on a piece of ribbon.


3. Write your message on the back and tie the tag onto the gift! 

I hope you found this little tip useful for next year's gifting! 

Stay warm!