Monday, December 10, 2012

Holiday Party Recap

Hello! Over the weekend my boyfriend and I hosted a holiday party for our friends.  The party was a blast, and I enjoyed baking and decorating!  I found this cute Christmas tree brownie idea here and attempted to do it myself.  I'm not the best froster, but this was a fun way to make the brownies festive!
Photo credit: David Santiago
I bought the pearl sprinkles and the decorating icing at AC Moore. I kept mine simple, but you can go all out with the decorating! 
**Tip: If you want to use a candy cane for the trunk of the tree, make sure you make thick brownies.  My brownies were on the thinner side, so the candy cane didn't fit. 

We also bought these awesome photo props from Party Goodies on Etsy.  She can customize your order.  


The theme of the party was Eat, Drink, & Be Merry!  We used this print out as part of the table centerpiece. 

Hope you're enjoying the holiday hustle bustle! Have a great week!

Sunday, December 9, 2012

Christmas Molasses Cookies

For me, molasses cookies taste like Christmas...must be all my wonderful memories of eating molasses cookies in my Sitty's kitchen while spending the week at her house with all the family over the holidays. (Sitty is grandma in Arabic.)  While I can never replicate my Sitty's molasses cookies, I am excited to say that I finally got them right this year!  The touch of cinnamon, gloves, and ginger make this cookie a rich, but not overly sweet cookie for the holidays!

Check out the recipe from my last year's post around this time....Molasses Cookies Recipe.


Tuesday, December 4, 2012

Pine Cone Frenzy

Lately I've been a little pine cone happy (as strange as that may sound)!  It all started with using pine cones as place holders in my previous Thanksgiving post.   Now I'm using pine cones to compliment my holiday decorating! I found my inspiration on pinterest.

DIY Pine Cone Door Hanging:

This is a easy and fast project.  I finished it in about 10 minutes! 

Materials:
Ribbon
Pine cones
Hot glue gun
Scissors

Method: 
1. Cut ribbon to desired length.  (Hold the ribbon from the door hook to see how low you want the pine cones to hang.)  Tie a knot where you want the pine cone positioned.
2. Tie a bow at the knot.  
3. Hot glue the bow to bottom of pine cone.

4.  Trim the excess ribbon on the side not for hanging.

5. Tie all the ribbons you have together and hang.  I used 3 pine cones but you can use more or less.


More pine cone decorating:


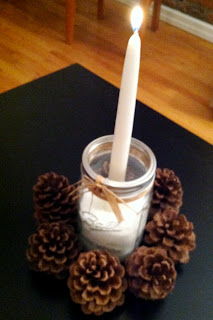
Coffee table center piece:
(pine cones, mason jar, epsom, salt, candle)

Mixing glam with rustic: 
(vase, costume jewelry bracelet, pine cone)


What are your favorite holiday decorating tips?

Thursday, November 22, 2012

Happy Thanksgiving!

I am so happy that I was able to share my Thanksgiving with my family, boyfriend, and especially with my happy 2 month old nephew! I hope you all had a special day wherever you are!

I'm going to share this year's table setting. I kept the table simple since the food is the main attraction (and major space taker.) I found the pine cone place holder idea here. You can use names or write something related to the day! (The little walnut is for my nephew.)


Thanks for taking a look! Until next time,

Sunday, November 11, 2012

DIY Autumn Placemat Pillow

Before I begin sharing my latest project, I want to announce that at the end of September I became a proud new Aunt!  (This is also the reason I have been MIA from my blog.) 

 I'm stopping by tonight to share another placemat pillow that I created for Autumn.  (You can find my past placemat pillow tutorial here.)  


I bought this placemat at Pier 1 Imports for a little less than $4.  (I love the gold trim detail!) Remember to look for double lined placemats if you want to do this project.  This time around I used stuffing to fill the pillow.  I cut the stitching of the placemat to make a small hole (but big enough to fit my hand.)  Then I stuff the pillow and simply hand stitched the hole closed.


The holidays are coming and I am excitedly gathering ideas.  I'm looking forward to sharing more projects in the near future!

Thanks for coming by, 

Tuesday, September 25, 2012

Brookies

If you like chocolate...and if you like cookies and brownies then you will love this simple and delicious recipe by the Clinton St. Baking Company!  "A Brookie is a cross between a brownie and a cookie."

Ingredients
1 tbsp canola oil
1 tsp unsalted butter
2 cups semisweet chocolate chunks
2 large eggs
1/4 cup light brown sugar
1/2 tsp vanilla extract
1/2 cup all-purpose flour
1/4 tsp baking power 
1/4 tsp salt

Method:
1. Preheat oven to 350F.
2. Melt the oil, butter, and 1 cup of the chocolate together in the microwave or on the stove using a double boiler. Let cool.
3.  In another bowl, whisk the eggs, brown sugar, and vanilla together.
4. Fold the melted chocolate mixture into the egg mixture.
5.  In another bowl, whisk together the remaining dry ingredients (flour & baking powder).  Add the flour mixture into the chocolate mixture, mix until combined, and then add in the remaining chocolate chunks.
6.  Freeze the batter in a shallow pan for 6 to 8 minutes (until the batter sets and hardens slightly.) 
7.  Coat 2 cookie sheets with nonstick coking spray or line with parchment paper.  Scoop about 10 tbsp-size Brookies onto each sheet.  Bake for 11-12 minutes, until the tops look dry and cracked (insides will still be moist.)  Cool completely.
Makes 10 to 20 Brookies

Enjoy!

Monday, September 10, 2012

DIY Autumn Wreath

Hello!! To help myself get over the end of the summer I put together a project to make an autumn wreath.  My inspiration came from this wreath from pinterest.  I'm proud of this wreath because figuring out how to weave the ribbon through the metal frame was difficult! Let the Fall decorating begin!! 

Materials used: 
1 16 in. metal wreath form
2 rolls of wired burlap ribbon (2 1/2 in. x 5 yrds)
decorative ribbon (for bow)
faux flowers embellishments 
scissors 
needle and thread
Method: 

1. Starting with the outer two wires weave the ribbon back and forth to make 6 loops.  Keep the ribbon loose to create a puffy loop.  You may need to adjust as you go by scrunching the loops together to make room for all 6.  At the 7th loop, straddle the ribbon from one side of the vertical wire divider to the next.  Then continue to make 6 more loops. 
2.  After you make your way around the outer circle, cut off any excess ribbon and tuck in the end.  Begin to make your loops on the inner circle just like the outer.  This time create 4 loops per section and straddle the 5th.


3. Decorate your wreath to your taste.  First I create a bow at the bottom.

(I tied a piece of ribbon vertically, and knotted it on the back.  Then I slid a longer piece of ribbon under the loop and tied a bow.  I'm not the best bow maker...took several tries!)

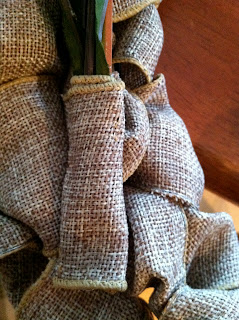
After arranging the faux flowers, I wrapped them together in left over ribbon.  I secured the wrap by hand sewing the end.  Then I attached the flowers onto the wreath by sewing the wrap onto the loops.
More fall decorating DIY to come!!
Thanks for coming by!

Tuesday, August 7, 2012

Pompom Tutorial

While looking for decoration ideas for my sister's baby shower I came across these pictures on Pinterest
These soft and festive pompoms make great decorations for any type of celebration!   They're easy to make and have a great effect!


Materials:
tissue paper
garbage bag ties
scissors

Method: 
1. Layer 8 pieces of tissue paper on top of one another.

2. Fold the tissue paper back and forth like an accordion.  (About an inch wide.)


3. Fold in half to mark the center.

 4.  Unfold and tightly tie a garbage bag tie in the center.  (Use scissors to help tighten twist.)

5.  At each end, round the edges with scissors to create a half circle shape. 

6.  Open the pleats. 

7. Gently separate each layer of tissue by pulling it towards the center.


 (If you want to make a flower, stop here.)

By separating all layers of tissue you'll end up with this type of pompom.


Create another pompom and tie two together (back to back) to create a round pompom.

See more pictures from the baby shower here!